
Before we launch into Decoupled Drupal with Gatsby, let's break it own first. Decoupling Drupal means separating the back end from the front end. This essentially means using Drupal as an API endpoint and reworking the front end to be rendered by another application. There are a few ways to do this, and it largely depends on what you need to do.
For example, you could serve all of your content through a front end application and hide your Drupal site behind a firewall so it can't be accessed by anyone but your site administrators. The front end application becomes your public-facing website and you would use Drupal to edit and create content.
Alternatively, you could keep your existing Drupal website and use the front end application to serve a select portion of content. This partial separation is great if you want to create a kiosk or similar display where you expose a slice of your content to a different audience.
One of the more popular options for the front end application is Gatsby, which has become more or less synonymous with decoupling Drupal in recent years. Gatsby is a React app that uses GraphQL to translate data from your Drupal site and render it as HTML. GraphQL is a translation framework that can accept different forms of input and present it in a unified way. As a result, Gatsby can actually accept a number of different data sources and can plug into lots of different CMS systems.
There are a few steps involved in getting set up with Drupal and Gatsby.
Installing Drupal
The first task is to install Drupal. I installed a basic Drupal using the Umami install profile to give me some content to play with. Using this as a basis I installed the JSON:API (found in core) and JSON:API Extras modules in order to expose an API.
What you are aiming to do is visit the page at /jsonapi and see a bunch of JSON output. This is the index page of your Drupal API and will inform Gatsby where to find the different data on your site.
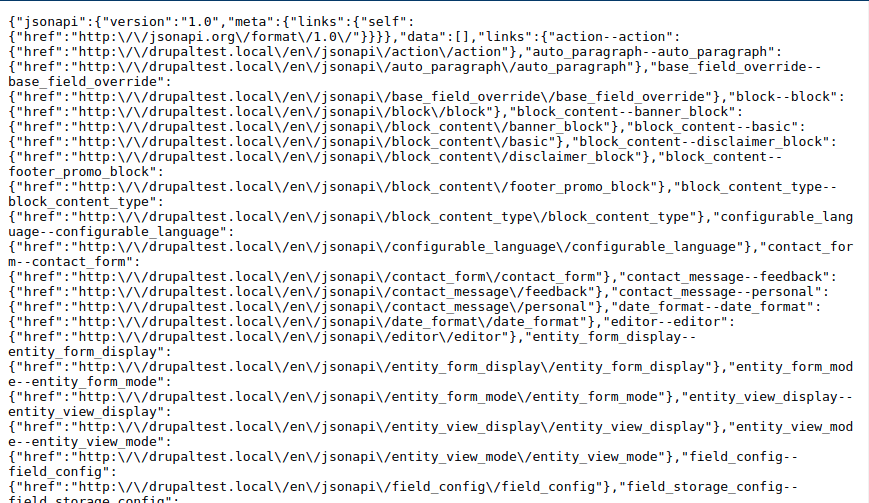
As I'm running the Umami install profile you can see there is information about recipes in there. If you can see this page as an anonymous user then you should be ready to go.
Installing Gatsby
Your Gatsby install should be in an entirely separate location from your Drupal install. As it's a separate application it is probably a good idea to treat it as such and keep the code base separate as well. There is no need to create a new directory just navigate to the parent directory and run the following command.
npm init gatsby
This runs through a nifty install program where you can select the relevant setup for your system. What I found when starting out was nothing really made sense in the available options for a Drupal site, but selecting none for all of the options is fine as you can add the plugins you need later.
Once complete you can test your Gatsby install by running the run command. Here, we are also passing in the option develop so we can build the site.
npm run develop
I had some initial difficulty in getting set up as I was running out of date versions of node and npm. Updating to npm 7.x and node 14.17.2 solved the weird errors and I was able to run Gatsby without any problems.
Once you get Gatsby running you can visit http://localhost:8000/ and see the default site install with links to some help pages.
What's also nice is that built into Gatsby is a GraphQL tool we can use to build queries for our project. This can be found at http://localhost:8000/___graphql and is a fully-featured tool that can even generate Gatsby code.
Before we can connect to Drupal we first need to install the Gatsby Drupal source plugin.
npm install gatsby-source-drupal
With the plugin installed we then need to configure it in Gatsby. Open the file called gatsby-config.js in the root of your Gatsby install and add the plugins section so the file looks a little like the following.
module.exports = {
    siteMetadata: {
        siteUrl: `https://www.yourdomain.tld`,
    },
    plugins: [
        {
            resolve: `gatsby-source-drupal`,
            options: {
                baseUrl: `http://drupaltest.local/`,
                apiBase: `jsonapi`,
            },
        },
    ],
}
This tells Gatsby our Drupal install is located at http://drupaltest.local/ (which is my local Drupal site) and to access the API through the path 'jsonapi'. This is the default JSON API endpoint we made sure existed earlier.
What we need to do now is create a page in Gatsby we can use to show our content. As I have the Umami install profile setup I decided to pull out a list of recipes as a list. The first step here is to generate our GraphQL so we can pull the data we need from Drupal. After a few minutes using the GraphQL tool is built into Gatsby, I had a query that would pull the 10 most recently created recipe nodes and expose some relevant fields we could use.
Here is the GraphQL I created.
query recipes {
  allNodeRecipe(limit: 10, sort: {order: DESC, fields: created}) {
    edges {
      node {
        id
        title
        field_summary {
          value
          format
          processed
        }
        field_difficulty
      }
    }
  }
}
In the Gatsby application, I created a file called recipes.js in the pages directory, which allows me to view the page at the path /recipes. This is more or less how Gatsby figures out the path structure of the decoupled site. The recipes.js file contains the GraphQL I generated and a function called RecipePage that accepts the data from the query and prints out the results. This is all tied together by the line 'export default RecipePage' which is what tells Gatsby a page exists in this location.
Here is the source code of recipes.js in full.
import * as React from "react"
import { graphql } from "gatsby"

const RecipePage = ({data}) => {
  return (
    <div>
      <h1>Latest Recipes</h1>
      { data.allNodeRecipe.edges.map(({ node }) => (
          <div>
            <h3>{ node.title }</h3>
              <div dangerouslySetInnerHTML={{ __html: node.field_summary.value }} />
              <p>Difficulty: { node.field_difficulty }</p>
          </div>
      ))}
    </div>
  )
}

export default RecipePage

export const query = graphql`
query recipes {
  allNodeRecipe(limit: 10, sort: {order: DESC, fields: created}) {
    edges {
      node {
        id
        title
        field_summary {
          value
          format
          processed
        }
        field_difficulty
      }
    }
  }
}
`
The line that states "dangerouslySetInnerHTML" just tells React that the HTML in our data doesn't need to be sanitised. Without this, any HTML is escaped and will be printed out as text instead of markup. As this is a testing application I am just injecting the HTML into the page and there are other (better) ways to do this.
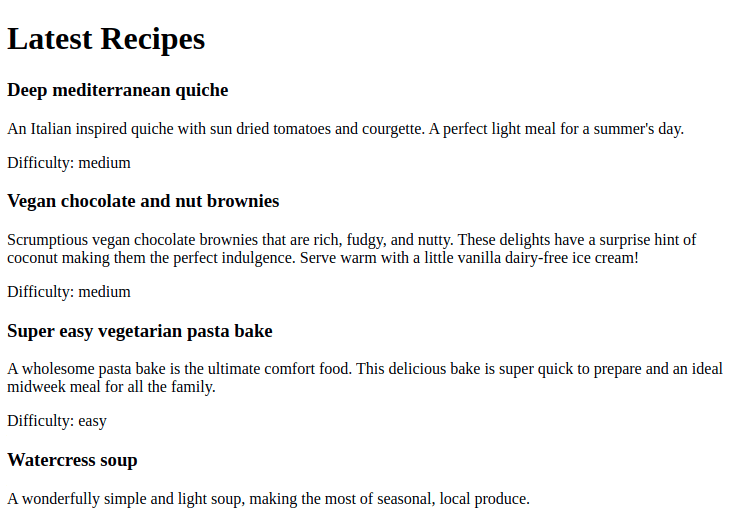
Now, when visiting the page at /recipes I am shown the following page.
One thing to realise is if you create another post in Drupal then you will need to stop and start your Gatsby application to see the new content. Restarting Gatsby allows the application to pull the data it needs from your Drupal site and generate the needed data for the pages to function. This is a key aspect to understand in your Gatsby setup, you will need to regenerate the site every time you add or remove content.
If you want to get a bit of a head start then you can take a look at the Gatsby using the Drupal demo from the Gatsby examples repository. This requires a few more plugins to get running, but if you download the repository and run `npm install` in the directory it will take care of everything for you. I did, however, have a few problems getting set up and if you are new to Gatsby then figuring out what is wrong can be difficult. It is a great example of how to get things set up.
Publishing the Site
Up until now we have just been working on a local development environment of Gatsby. To serve the site as a stand along with thing we just need to tell Gatsby to build it. This is done by running the following command.
npm run build
Once complete you will see a directory called /public in your Gatsby source code. This contains all of the files needed to allow your decoupled site to work. You just need to upload that directory to a web server in order for the decoupled site to start working.
Decoupled Drupal with Gatsby - Conclusion
I have barely scratched the surface of Gatsby here. It is a robust and feature-rich application that allows you to build fully interactive sites that are quick and responsive. I haven't touched upon using Drupal media and files, getting single entities, or any of the layout and styles that go into building a Gatsby template.
There are quite a few benefits to this approach.
- Your decoupled Gatsby site will be very fast. There is no database and no back end servers to worry about so you can serve web pages about as fast as possible.
- As the Gatsby site and your Drupal install are completely decoupled there is no need to expose your Drupal site to the outside world and so you can hide it behind a VPN or password wall.
- Gatsby is built using your site's data and not templates. This means that you don't need to go hunting for any Drupal links to inaccessible content like you would with the Tome module.
- You can still use all of the awesome editing tools that are built into Drupal to edit and publish your content.
There are a few downsides as well.
- Gatsby is an entirely different tech stack from Drupal and as such can take a bit of getting used to if you aren't familiar with React applications.
- Instead of one application to support and maintain you now have two. True, one of those sites can be hidden behind security measures if you have gone for the fully decoupled setup. If you are still running a Drupal site alongside your Gatsby application then you need to ensure that both are maintained properly.
- You will also need to set up additional tooling in order to publish and deploy your Gatsby application. This essentially boils down to running the build command and uploading the result, but it really needs to be automated.
- If you change any content in your Drupal site then you will need to regenerate your Gatsby site in order to publish that. This can cause a bit of a headache on sites that publish content regularly or on a schedule.
- Previewing your Drupal content using Gatsby templates isn't straightforward as your decoupled site won't be rendered using Drupal templates. Although the Drupal Gatsby module exists to facilitate this you will need to spend some time getting this working. This module is probably the best approach as the alternative is to build your theme layer twice, once in Drupal and once in Gatsby.
I really like what I have seen so far and despite a few (quite minor) drawbacks, I can see why it has become popular in recent years. There really is a lot of power in the system and with the addition of a few plugins, you can extend the functionality of Gatsby to include search and contact forms to allow some user interactivity.