
Content is significantly improved with embedded images. They can be used to explain points or to liven up an otherwise dull-looking page that would have been a wall of text.
I previously talked specifically about SVG images and Drupal 9, but how about embedding other images?
Uploading images into content in previous versions of Drupal was a bit hit and miss. It normally required the inclusion of a few modules to get things working and usually meant having a very customised experience.
Since Drupal 8 and the inclusion of CKEditor into core it has been possible to embed images into content. When the Media module and subsequent Media Library modules became stable in Drupal 8.8 it was then possible to embed all types of media into content, not just images. After the release of Drupal 9 these modules have become a go-to solution for embedding images into content.
Since the image upload and media library approaches have slightly different pros and cons I thought I would look into each one.
Image Upload Button
If you have installed Drupal using the standard install profile (which is quite a common thing to do) then you will already have the Image Upload feature installed. This is part of the CKEditor module in Drupal and the standard install profile will create a text format that will allow you to use this straight away.
When you go to create some content on the site you will see the CKEditor dialog with the Image button present in the tools at the top of the editor window.

Clicking on this image icon will open the CKEditor dialog for inserting images into the content.
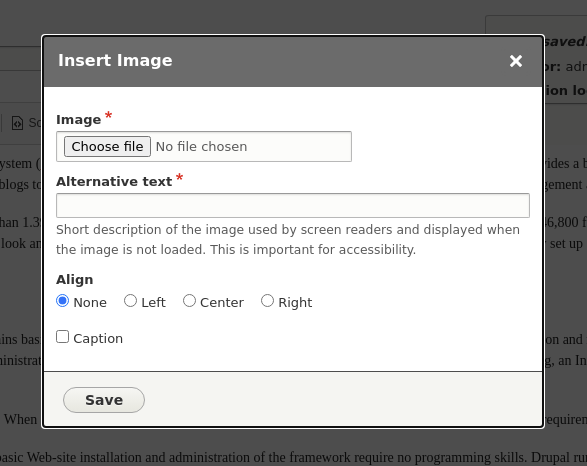
When you have selected your image and clicked "Save" the dialog will close and your image will be visible in the content area.
Looking behind the scenes Drupal has actually done a couple of things here. It has uploaded your file to the web server and written a record to the database so that it can manage that file. It also keeps a record of where that file was uploaded to the system, in this case an item of content, which allows for some simple content tracking.
Once the upload is complete Drupal will create some HTML that it will embed into your content area. This HTML will look a little like the following.
<p><img alt="The Drupal logo" data-entity-type="file" data-entity-uuid="bab46008-9adf-45fa-97a4-a555775ea1dc"
src="/sites/default/files/inline-images/drupal.png" width="256" height="256" loading="lazy" /></p>
There is also the option to add a caption to the image, which adds a figcaption HTML element below the image. This is a good option to have, but you need to make sure your theme supports it otherwise it will not look tidy with the image.
That's pretty much all there is to it for the image upload feature. Let's look at the pros and cons of this approach.
Pros:
- Generates simple markup in your content pages.
- Drupal stores some usage information on where the image is embedded on the site
- Migration is simple as the content directly references the images
Cons:
- Images can't easily be used across pages of content. In fact, the best solution to this is often to upload the image again when it is required on another item of content.
- No image styles are used to render the image so you either need to ensure your site styles will cope with the image or just upload the image at the correct resolution.
- Drupal can report on usage information about the files, but since this is usually a one-to-one link between image and content item this isn't that useful.
- Image uploads aren't controlled by permissions. This means that if the page is unpublished then the image will still be available to view.
I should note that some of these issues regarding permissions and file re-use can be solved by using the Drupal IMCE module. This module has a drop-in replacement for the file upload dialog in CKEditor that will allow users to upload or select from the existing files on your site. IMCE does this by providing access to the files directory from your web browser, but you can (and should!) add permissions and security to lock down how IMCE is configured.
Media Embed With The Media Library
The Media module comes bundled with Drupal and has been stable since version 8.6. Instead of managing files, you manage files stored in Drupal entities, which means that they can be used and reused around the site as many times as you like. Installing this module will allow you to manage media, but it doesn't cover embedding media into content.
Since Drupal version 8.8 the Media Library module has been a stable part of core and this builds upon the Media module. This includes the ability to have an administrative interface for media and the use of an interface for selecting media for fields and text content. The media embed button is a combination of a picture and musical note, to signify that it provides more functionality.

Clicking on this button will present you with the media library user interface, which allows you to either upload or select existing images. The image below shows a dialog with the image upload field and an image that has already been uploaded.
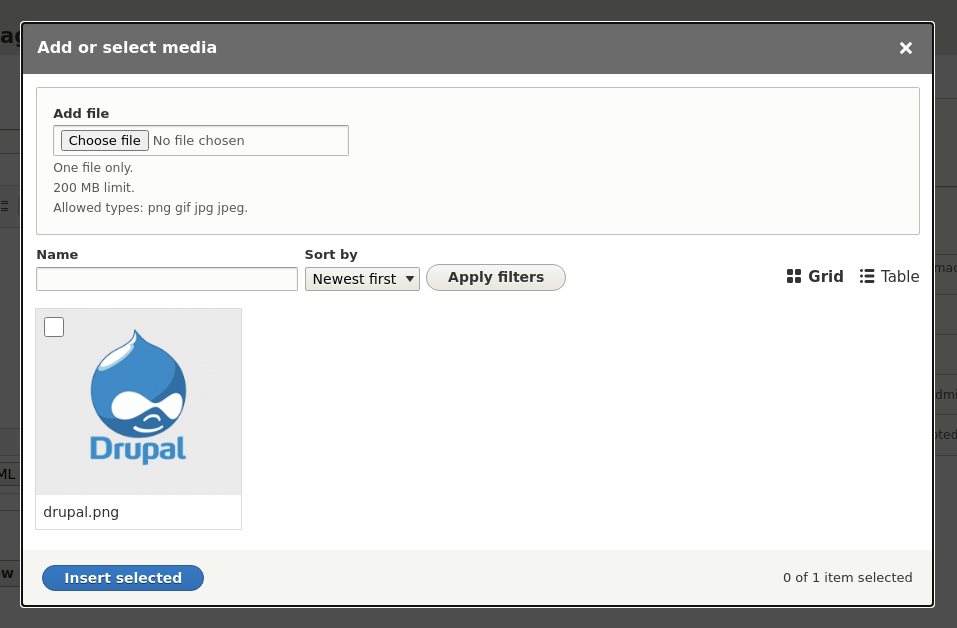
Selecting the image you want and clicking the "Insert selected" button will embed your selected image into the content area.
At first glance, this appears to have done the same as the image upload, but there is more going on behind the scenes. When you upload an image Drupal will create a Media entity, which is essentially a wrapper around the file you uploaded. This wrapper can have extra fields or other data associated with it, giving you more flexibility than the standard file upload interface.
After you click the insert button Drupal will create markup that looks like the following (although this will depend on the theme you are using).
<article class="align-center media media--type-image media--view-mode-default">
  <div data-quickedit-field-id="media/1/field_media_image/en/default"
class="field field--name-field-media-image field--type-image field--label-visually_hidden">
    <div class="field__label visually-hidden">Image</div>
              <div class="field__item">  <img src="https://www.codeenigma.com/sites/default/files/styles/large/public/2021-09/drupal.png?itok=4E3362OO"
width="256" height="256" alt="The Drupal logo" loading="lazy" typeof="foaf:Image" class="image-style-large" />
</div>
          </div>
  </article>
This is not the whole picture though. If you look at the raw source of the media item you will see something that looks like this.
<drupal-media data-align="center" data-entity-type="media" data-entity-uuid="e5321fa9-8a61-49f2-b048-e7e2646f7a94"></drupal-media>
This is what Drupal stores in the content field in the database. When an item of content is loaded Drupal will see this tag and swap it out for the media entity identified by the UUID. The media is then rendered using a view mode of the entity, which includes the image style that was selected for that view mode. Through the CKEditor admin interface, it is possible to set a default view mode for all embedded media or to allow the selection of the view mode as the media is embedded.
Your users will never see the drupal-media tag as Drupal will always replace them with the correct markup.
The fact that a view mode is used to control how the media is rendered means that it can be rendered in different ways depending on the context it is being shown in. The markup surrounding the image can be changed by overriding the template used. The example markup above is from the Drupal default Bartik theme. The rendering process will also pass through a preprocess hook and at that point, the view model can be changed for different contexts. Something not easily done with the image upload feature.
This approach does have some pros and cons, so let's dig into those.
Pros:
- Images are centrally managed and can be re-used on other items of content.
- An image can be changed through the media item, which will change that image in every place it was uploaded.
- Images are rendered using image styles to resize or otherwise tweak them.
- The surrounding markup that accompanies images is also themable via view modes and templates.
- Other types of media can be embedded using the same dialog, which allows for greater versatility in what content is embedded into the content.
- Media is governed by a separate set of permissions. This means that you can allow certain user roles to upload images but allow all users to embed images already existing on the site.
- Media can be published and unpublished, so if their container page is unpublished they can also be unpublished to prevent access.
Cons
- For images that are only for a single page, the media item still ends up in the media library. This can create clutter with single-use media items hanging around in the media library.
- Migration of images can be difficult due to the way in which the images are embedded into the content. It's not impossible, it just requires some more in-depth understanding of how media is embedded into content areas.
Embedding images into content In Drupal 9 - Conclusion
The ability to embed images out of the box is a powerful feature for Drupal. If the default image upload doesn't fit your needs then you can go for the media library approach and expand how your site manages images. As Drupal media items are essentially fieldable entities they can have data that can change how they are being used and embedded on your site. As their rendering is also controlled from their view mode it is also possible to create responsive images that adapt to the content they are present on.
It's a good idea to pick one of these methods as having both upload options side by side will likely cause confusion. Having upload features act in a consistent and predictable manner makes for a better user experience.
Which type of embed you select depends on your needs. For a small blogging site it's probably fine to go for the simple method as most of the images will probably be single use. For more complex publishing sites with lots of editors, you will probably want to go for the media embed as it will give you more control over who embeds images and how they are rendered to the final page.
Using the media library also gives you the ability to embed other types of content in your pages. You can therefore use that single dialog to allow users to embed images, documents or even references to external media like videos and audio content.
I should also mention here that there are a couple of contributed modules that also allow images to be embedded in the content. Most notable is the Entity Embed module, although this module requires a lot more setup to get working. Whereas you can get going with the media library in a few clicks, I have spent hours working with entity embed to get the correct workflow I wanted.
Or
An alternative approach to uploading and embedding media into your site is to use a Digital Asset Management (DAM) system. This involves uploading your images to a DAM site (sometimes separately from your content) and then allowing your content creators to pull in the imagery they want. This can give you tighter control over the images that make their way to your site, but it depends on the product selected to act as the DAM. Several DAM products exist, but not all of them have integrations with Drupal, so if you are looking to select a DAM you need to be sure that either Drupal is supported, or you are able to develop a custom integration module.